by guest contributor Amanda Padgett
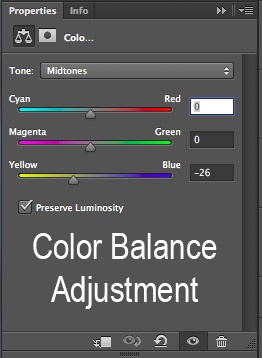
Color balance is an adjustment layer in Photoshop that allows you to easily alter the color channels of an image. The changes made can be made via a curves or levels adjustment also, it’s just that the layout and labeling in the color balance adjustment layer is very easy to understand and use.

If you want to reduce a color, say blue, in an image, you simply click on the slider for that color and move it towards the opposing color. You can use the layer mask and conceal areas you don’t want the change or invert the mask and use a brush to reveal the change is small, local areas.
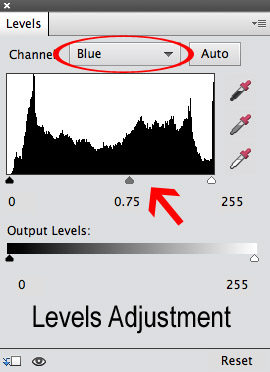
To make similar changes to an image via levels (and/or curves) you need to understand how the colors work. (This is illustrated more thoroughly in the video tutorial at bottom of post).
- Red channel controls both red and cyan – as red go up, cyan goes down and vice versa.
- Green channel controls both green and magenta – as green go up, magenta goes down and vice versa.
- Blue channel controls both blue and yellow – as blue goes up, yellow goes down and vice versa.

Below is a short video showing quickly how to use the color balance adjustment, then how to produce the same effect with levels, in both Photoshop and Photoshop Elements.
If you would like to learn more about layers in general, check out my All About Layers workshop recording and notes. Also, there is a Levels workshop/webinar available in the webinar bundle, if you would like to delve deeper into the levels adjustment.
![]()
 Hello! I’m Amanda, a quirky, introverted Mom of four, who is passionate about helping others learn their cameras and editing software. I also currently homeschool my four kids, ages 13 to 6, all whom run away when they see me carrying my camera.
Visit me at my WEBSITE and FACEBOOK page!


