by Guest Contributor Anna Gay
Histograms in editing software are a useful indicator that will help you see what tonal adjustments need to be made to your image in order to achieve a balanced tonal range.
Having a working knowledge of how your histogram works is important, but you will find that histograms vary from image to image, and your final edit is determined by your personal preference. For this reason, I’m a firm believer that there is no such thing as a “perfect” histogram. For some images, you will want deep shadows, and for others, you will want bright highlights, so for this tutorial, we will look at a few different histograms to see how they function.
Ideally, you want your histogram to cover the entire tonal range, from black point to white point (black being shadows, white being highlights).
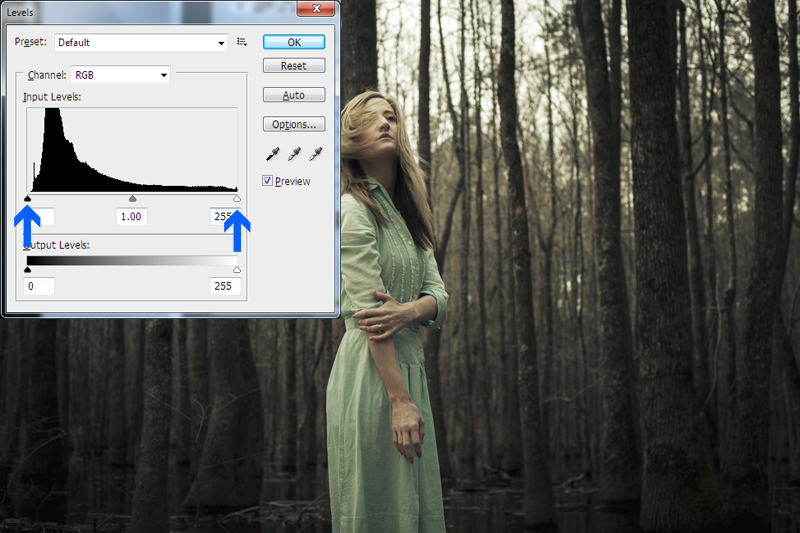
For this image, I am looking at my histogram through the Levels adjustment panel in Photoshop. You can also view a histogram in the Adjustments panel on the far right of your screen in Photoshop by selecting Window>Histogram, and making sure that Histogram is checked.
As you can see, the histogram covers the entire range of highlights and shadows, with an emphasis towards shadows. The shadows can be seen on the left of the histogram, with the highlights on the right. Looking at the image, you can see that it has a lot of shadows and minimal highlights, hence the majority of the tonal range leans towards shadows, or the left side of the histogram.
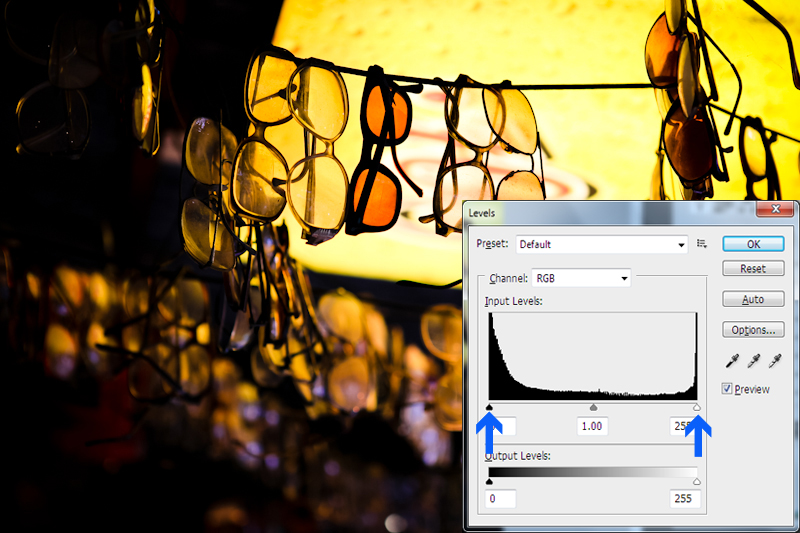
Comparing this image to its histogram, we can see that, while the image covers the entire tonal range, there are significant spikes on the far left and far right. This tells us that the image has tones that include pure black and pure white. Looking at the image itself confirms what the histogram is saying: if you look at the bottom-left corner of the image, you will see a solid black tone with no detail. If you look at the center of the image, near the sunglasses, you will also find pure white, as indicated by the spike on the far right in the histogram.
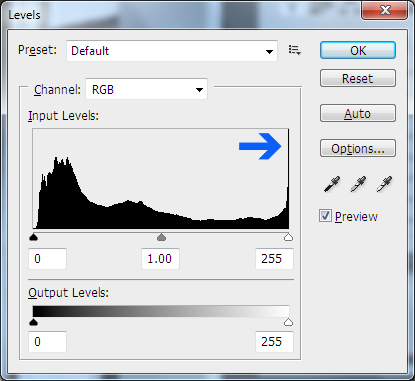
Looking at the above histogram, what do you think it is telling us? We know that the far- right of the histogram represents highlights, so we can surmise that the spike on the far right indicates that we have pure white highlights. In other words, this histogram tells us that we have an image with severely blown highlights!
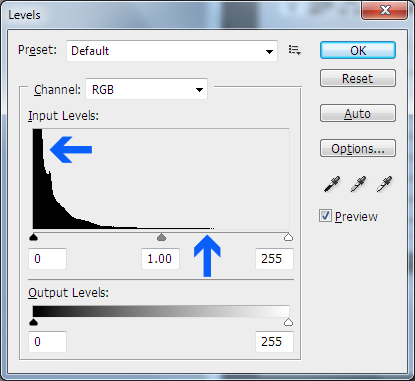
The opposite is true for this histogram. Our shadows are completely black, and we have no blown highlights. In fact, we have very few highlights, as the tonal range barely passes the midtone (gray) slider in the middle of the histogram. This histogram is telling us that our image is underexposed, with significantly clipped (solid black) shadows.
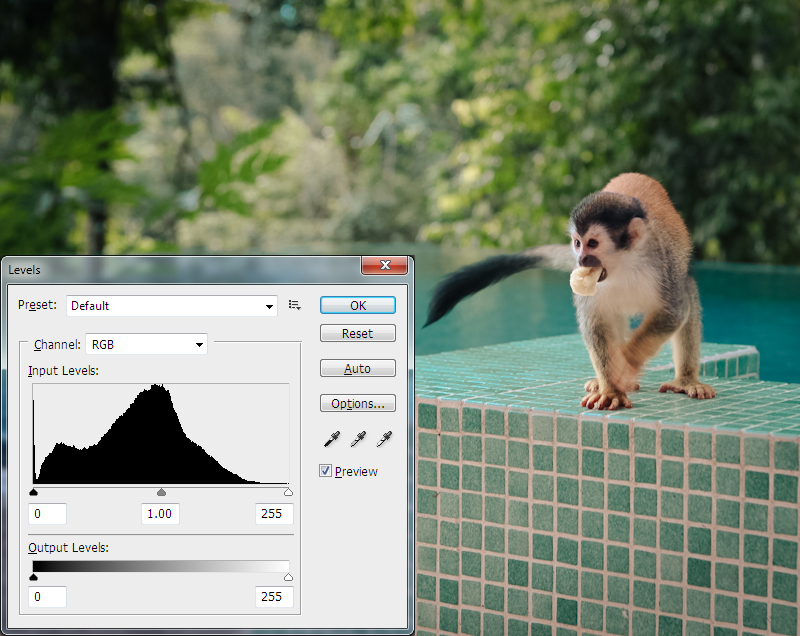 In this image, the histogram shows that the image covers the entire tonal range, with the majority of the image consisting of midtones, hence the center-weighted histogram. We still have a spike on the far-left shadow range, as you can see in the top-left of the image the shadows are completely black in the foliage. In this case, since there are not too many areas of solid black, this is no cause for alarm. The overall tonality of the image is sufficient in this scenario.
As I said earlier, histograms are a handy tool in determining the overall tonal range of your image, and where you might want to consider making adjustments. However, keep in mind that histograms are simply a guide, and your editing preferences, as well as the image itself, will also dictate the final result of your histogram.
![]()
 About the Author: Anna Gay is a portrait photographer based in Athens, GA and the author of the dPS ebook The Art of Self-Portraiture. She also designs actions and textures for Photoshop. When she is not shooting or writing, she enjoys spending time with her husband, and their two cats, Elphie and Fat Cat.


