by Guest Contributor Angela Vaughters
Color Spaces. Adobe RGB 1998 versus sRGB versus ProPhoto RGB, etc. 8-bit versues 16-bit. Ahhh! The confusion! To make matters worse, leaving your programs at their defaults may cause unexpected results when you go to display your images in print or on the web (color shift, anyone?).
I will attempt to simplify things a bit by letting you know the method I’ve found to work. If you are like me and you capture images with the intention of posting them on the web and getting them printed, these steps should work for you, too.
Here’s the thought… photos saved for the web must be 8-bit and in sRGB color space. Most printing labs only accept files in JPEG format (which means they are 8-bit) and in sRGB color space. Therefore, the method I use focuses on producing images in 8-bit, sRGB format.
I know other color spaces have a wider gamut, but if my output (web and print) cannot use those additional colors, there is no advantage for me to use them in my workflow. As a matter of fact, if I start in one of the larger color spaces and at the end of my workflow convert my images to sRGB, I will lose color info and end up with dull colors in my final images. It’s happened before (sniff, sniff!).
Here’s an example of a color shift happening when I edited the image in Adobe RGB and then converted to sRGB before saving:
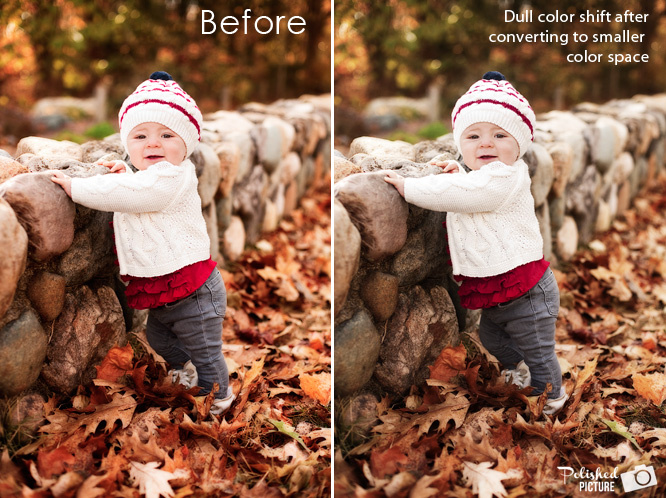
This problem can be avoided by keeping your color space consistent throughout the entire capture and editing process.
Here are all the areas to set your color space and bit-depth:
Set your camera’s color space to sRGB:
If you shoot RAW, your camera’s color space setting will actually not have an impact on the image file since RAW files contain all the information that hits your camera’s sensor. However, your camera will use the color space setting to generate both the preview on your LCD screen and the histogram. If you shoot JPEG, the color space will be used when your camera converts the captured data to a .jpg file.
Set Color Space Preferences in Lightroom: There are 2 locations for this:
1. The Preferences Menu (Mac: Lightroom → Preferences or PC: Edit → Preferences). In the ‘External Editing’ tab, set the Color Space to sRGB and Bit Depth to 8 bits.

2. In the Export dialog (when you are exporting images). If you are exporting your file as a .jpg (as I do), you just need to make sure that under ‘File Settings,’ Color Space is set to sRGB. (JPEGs are already 8 bits, so you don’t need to set that).
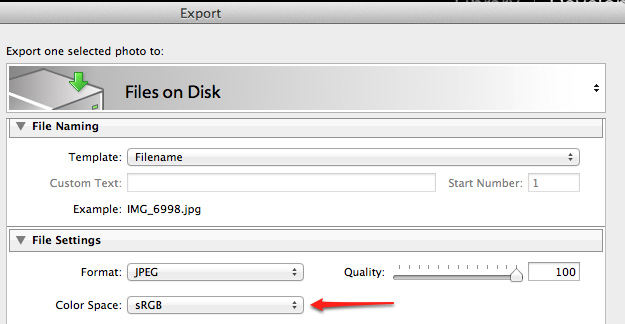
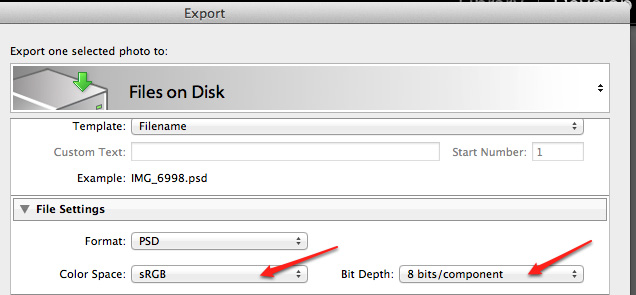
If you export your images in PSD format, it will give you the option to set the Bit Depth as well, so make sure it is set to 8 bits.
Set the Color Settings in Photoshop to sRGB:
Go to Edit → Color Settings. Under Working Spaces → RGB, choose sRGB.
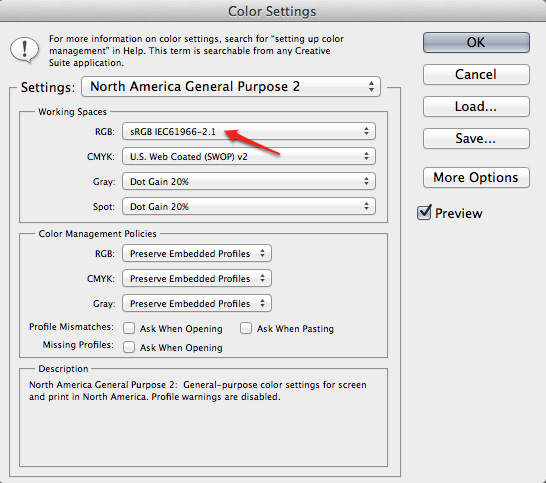
All of my photos come into Photoshop from Lightroom, so I know they are coming in as 8-bit, sRGB files. If you have any doubts, you may want to change your Color Management Policies.
The way it’s set in the diagram above is to ‘Preserve Embedded Profiles’ – meaning that if you open an Adobe RGB file, for instance, Photoshop will keep the file in Adobe RGB. However, you can have Photoshop automatically convert a mismatched profile to your desired color space (in our case, sRGB) by selecting ‘Convert to Working RGB’. You can also have Photoshop notify you of any profile mismatches by checking the boxes (circled below).
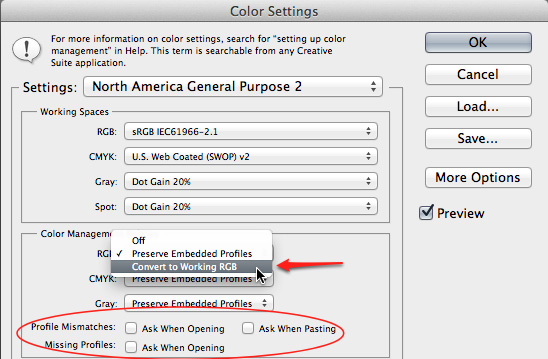
You can set up the Color Management Policies according to your own personal preferences.
Note: If you use Adobe Camera Raw at all, color space and bit-depth settings are at the bottom of the window, directly under your image. You can click on them to change them as necessary.
 And that’s it! You are now set up for getting consistent color in your images from start to finish.
If your needs are different (maybe you have a wide-gamut monitor and you only print to a color-managed inkjet printer, for instance), of course you can tailor these settings to your needs. The idea is to keep things consistent so you don’t experience unexpected color shifts!
Happy Editing!
![]()
 About the Author: Hi, I’m Angela! I am a computer programmer turned mom turned photographer turned I’m-not-sure-what! As a new photographer, I had spent so much time staying up late and piecing together information, trying to figure out how to edit my photos. I created Polished Picture to be a photo editing resource, sharing what I’ve learned on my photo journey – mostly through lots of trial and error!
Visit Angela at her WEBSITE | PHOTO BLOG | FACEBOOK today!



I agree with most of this. However, when you are actually editing in LR, you are developing in ProPhoto RGB. It’s not till you take the photo to PS or export as a JPEG that you are seeing it in sRGB. If the photo never goes to PS (not a loto of mine do) then my export is different than what I’m seeing in LR. I find that to be a big weakness of LR. I should be able to EDIT in my final color space.
I shoot in raw only, & had learned to do everything in 16 bit until print, then convert to 8-bit. I’m always set on sRGB, as well. I was taught that editing in 16 bit fills in the color gaps, so when compressed to 8 bits no info’s lost. Is this not good practice? I have never had an issue with “banding” (print or web).
Thanks, Jen, for pointing this out regarding not being able to set a working color space in LR. 85% of my stuff goes into PS – curious to know if the color shift is problematic or if it is negligible. That sure does seem to be a shortcoming of LR. Interesting!
Amanda – if your current method is working for you, I say don’t change it. For me, I like to edit in the color space and bit depth of my final image so I don’t have any surprises by converting at the end. But if you don’t notice any problems, there’s probably no need to change it. 🙂
this probably explains why my boyfriend’s photos look so much different once he uploads them to flickr. Thank you so much!
Thanks for sharing the info!
great tutorial!! I just learned this the hard way last week!!
any tips on calibrating in PSE 10 or can it not be done?????